Road to Wall Mastery
The Road To Wall Mastery chart will provide you with a metric and training guide to use with a wall. Before you use the chart, you should first read about how and why to train with a wall here.
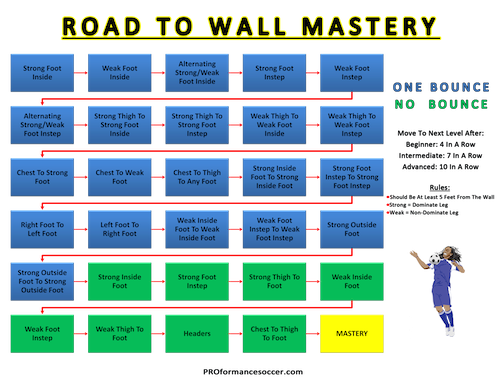
The chart provides over 30 exercises. However, because there are so many other drills you can use the wall for, it’s very important to understand that this chart only trains a variety of volleying exercises. These volleying exercises will greatly improve your first touch and “soccer coordination”. There are over 80 other wall exercises that train passing, shooting and turning skills. So in a nutshell, this chart is just the beginning and nowhere close to the be all and end all of wall training.
The chart exercises are difficult, and are recommended for players 8 and older.
Now to the Chart
This chart can be used with any wall, but it is best if the surface in front of the wall (where you are standing) is hard. This means either cement, a hard packed surface, or a grass surface that will provide a decent bounce.
Imagine this chart is a video game, with the top box in the upper left corner (Strong Foot Inside) the 1st level. Like all videogames, the 1st level is the easiest and from there it gets progressively more difficult.
Start by standing about 5-7 feet away from the wall. Pick the ball up in your hands and toss it underhand, waist height, to the wall in front of you. After the ball bounces off the wall, and then hits the ground, perform the skill in the box.
So for example, Box #1 is ‘Strong Foot Inside’. Let’s say you are right foot dominant – in other words, your right foot is your strong foot. Underhand toss the ball to the wall, let the ball bounce once, and then with your right inside foot volley the ball back to the wall. After it bounces off the wall, and then bounces once, volley it back to the wall again. Repeat this same exercise skill to a set goal. For instance, if you are a beginner, after 4 successful right foot inside volleys in a row, you can then move to the next box.
Here is sequence again for Right Foot Inside:
RIGHT FOOT INSIDE – WALL – 1 BOUNCE – RIGHT FOOT INSIDE – WALL – 1 BOUNCE – REPEAT
If you make a mistake while trying to get 4 in a row, start back at 0 by tossing the ball underhand to the wall. Here are some types of mistakes that will be made:
You did not use the correct part of your foot or body to volley the ball back to the wall. Remember, to properly perform the exercise in Box #1, you must only use your strong foot inside. If you use your weak foot or you use the instep of your strong foot it wouldn’t count
After you correctly perform 4 in a row (7 in a row for intermediates and 10 in row for advanced wall users) go to the next box. If you make a mistake on Box #2 begin at 0 on Box #2. Once you have successfully completed a box, move on to the next box, and continue until the clock expires (more on this later).
One FYI, when see the word “INSTEP,” this is just soccer jargon for the laces or top of your foot.
If you are able to get through all the blue boxes, a difficult task for any player younger than 13, move onto the green boxes. The green box exercises are NO BOUNCE BOXES, meaning the ball does not bounce on the ground after it hits off the wall. Eliminating the bounce off the ground will make the exercises more difficult because the volleys you make to the wall will need to be more accurate and without the bounce, the ball will come back to you at a rapid-fire speed. Quickness and accuracy will become much more important factors.
Some keys:
The clock
The best way to train with this chart is to post it to the wall you will use, and set a clock for 10 minutes. See what box you can get to at the end of ten minutes. Date and record your score and the next time you go back to the wall, see if you can make it beyond the box you reached the last time. Every time you go to the wall, make sure to start at Box #1.
Be honest and make sure your score is accurate and that each level is correctly performed. An honest score gives you a way to chart your progress.
When you are first starting out with the wall, you may spend all 10 minutes on the first box, or you might progress quickly and get through several boxes until getting stuck on a certain box/skill. Do not get discouraged – if the wall was easy it would not identify weaknesses in your game properly. The chart is such an effective soccer training tool because ultimately it identifies your technical weaknesses.
If you make progress on the wall chart, you will make progress on the field. Find 30 minutes twice a week to go to the wall: 10 minutes for the wall chart and another 20 minutes to train the other skills that the wall will help you master!